The Size of Photographs.
Understanding the file formats of digital cameras
Digital cameras are an essential part of the surveyor’s tool kit and because photographs can be uploaded into the Home Condition Survey they are an excellent tool to help you communicate with your client.
Are you fully conversant with all the aspects of your camera and in particular how to use the right file size?
RAW and TIFF vs. JPEG
There are three main file formats for digital photographs, these are RAW, TIFF and JPEG formats.
Both RAW and TIFF do not apply any compression to the photo. When your camera saves a digital photo as a RAW or TIFF (if your camera has the option of doing so), the photo includes all of the information captured by your camera’s image sensor and therefore takes the maximum amount of space on your memory card.
However, JPEG is a much more common file format and probably the one that we are all familiar with, and it uses compression. It is a much more popular format as it enables memory cards to store more photographs, saving them with less information and therefore they take up less space.
| RAW / TIFF | JPEG | |
| FILE SIZE | 3.4 MB | 1.3 MB |
| NO. OF PHOTOS | 38 | 98 |
So, when is it best to shoot in JPEG and store more photos and when is it best to shoot in RAW/TIFF and store more information in each photo?
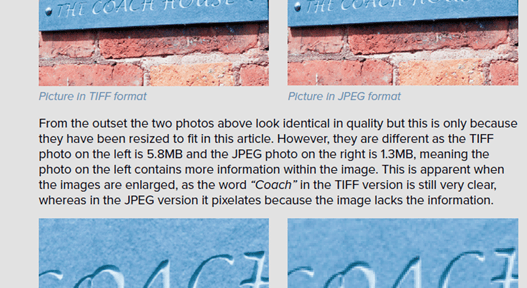
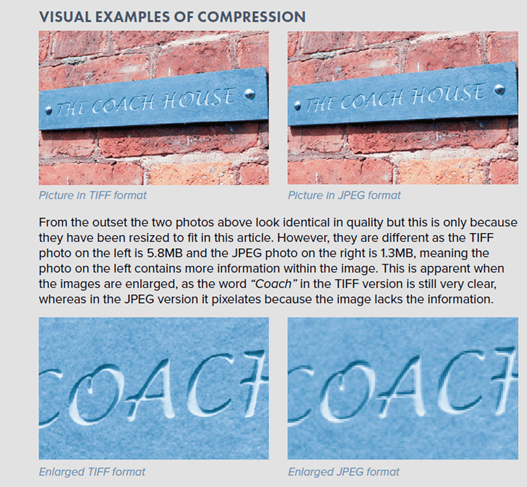
Compressing JPEGs
A digital photograph stored in the JPEG format means that the file sizes are smaller. On many digital cameras the user can determine how much compression to apply to the photograph size.
Cameras will normally allow the user to set two or three levels of compression.
| JPEG low compression | JPEG high compression |
| 1.3 MB | 0.7 MB |
And in terms of the number of photographs you can save on a media card this can, in effect, double the capacity of the card:
| JPEG low compression | JPEG high compression |
| 98 photos | 183 photos |
The problem with a highly compressed photograph is that it will lose detail and the image will start to become grainy. If you are using your photograph as evidence and you lack the information or detail it may hinder your influence. Since a lot of cameras do not save TIFF or RAW formats and because JPEG is a file format that is universal we will focus on the JPEG format.
The issue to remember is what the photographs will be used for. However, before discussing the file size the other thing to consider is the ‘zoom’ capacity of the camera.
Digital Zoom and Optical Zoom
Most cameras will have both optical zoom and digital zoom.
Optical zoom works just like a zoom lens on a traditional film camera. The lens changes the focal length and magnification as it is zoomed and the image quality stays high throughout the zoom range.
Digital zoom works by simply cropping the image to a smaller size, then enlarges the cropped portion to fill the frame again. Digital zoom results in a significant loss of image quality.
As a surveyor you will be inspecting the property from ground level and so you will need a camera with a good optical zoom. There are a range of entry level cameras which now offer up to 30x Optical Zoom – excellent for photographing chimney details from the ground.
Should I compress my photographs?
The key thing to consider is how your photographs will be used:
- In the report to illustrate a point for the client
- As part of the record of inspection that you will consider when writing the report
- As a means to defend your actions or conclusions in the unfortunate circumstance that a client later makes a claim or complaint against you
For the latter 2 uses, the better the image quality then the more detail you will be able to see, or if you are a member of the SAVA Scheme and we manage the complaint on your behalf, how much detail we will be able to see. It would therefore benefit you to shoot in RAW or TIFF format.
This is very important. We are currently dealing with a complaint relating to a crack in some render on the side wall of a property underneath a window at first floor level. It would not be clearly visible from ground level.
The matter is still live, but the reason for mentioning it here is that while the surveyor took a photograph of the side wall, the size of the file is such that the photograph is very limited and we are not able to examine the wall in detail.
The size of this photograph is 167.5KB, this is a very compressed file and so the viewer is unable to see any detail. Had this file size been at least 1MB then this would have included sufficient detail for us to see the wall clearly. Alternatively, the wall could have been photographed using an Optical Zoom or the surveyor could have stood closer to the issue and taken the photo.
Changing the format on your camera is straight forward and can be found in the camera’s settings menu. If your camera can only shoot in JPEG and you don’t have the option to change the format to RAW then usually you will have the ability to set the compression size of the JPEG.
If your camera doesn’t have the ability to change the compression or format in its menu then the compression size may be changed at the time of shooting. However if you have no ability to alter the camera’s compression rate at all then it may mean you need to buy a better camera.
If your camera does enable you to change compression size then at least 1MB will be fine.
Uploading Photographs into a Report
When you put a photograph into a document and save that document as a PDF, the PDF writer will automatically compress any photographs loaded into it. Therefore, if your client reads the PDF on screen they will not be able to zoom into any detail on the photograph in the PDF, even if you uploaded a larger file into the report.
So, if you use the SAVA HCS we suggest that you compress any photographs that you want to upload into the report. The HCS software struggles when it is pulling large files together into the PDF and can time out if the system is being heavily used at that time.
However, we recommend you save all your photos in their original uncompressed format and keep them there to help defend your decisions if needed.
If you are then putting any of those photos into a report or onto the SAVA HCS we would recommend compressing the original and saving a copy so that the original stays intact so the report has a photo that better serves its purpose. Once the report is finalised you won’t need the smaller duplicated file and can delete it. As you’ll still have the original, if you are called upon to provide evidence, it will all be there in its original format with the most information.