Cavity Wall Tie Failure.
In this article, recent Sava graduate Chris Moran shares his experience shadowing the award-winning company ‘Brick-Tie Ltd’. Chris spent the day with Brick-Tie technicians carrying out cavity wall tie replacement on a 3-bedroom semi-detached house in Sheffield. This article provides a useful overview of cavity wall tie failure, identifying factors, and how professional experts go about replacing failed cavity wall ties. Chris also provides some useful tips for students struggling to find mentoring opportunities during times when it has proven difficult for many students to gain practical shadowing experience.
What is cavity wall tie failure?
Cavity wall tie failure is a failure of (or corrosion to) the ties used to hold the internal and external walls making up a cavity wall.
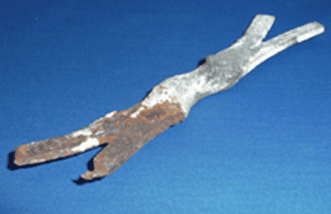
The main cause of failure is the rusting of metal ties; although, there can be other causes, such as failure to properly bed the tie in the mortar joint, poor quality mortar reducing the bond between tie and mortar, or not installing the requisite number of ties.
Figure 1: Rusting cavity wall tie
The following factors play a part:
- Rust leading to disintegration resulting in possible wall collapse.
- Rust expansion (up to 600% the size of the original tie!).
- Cracking (normally horizontal) and structural distortion in the walls.
- Cracking leading to reduced weather resistance of the wall and an increase in corrosion.
- Corrosion of wire ties can cause total failure without the warning tell-tale signs of cracking. This is associated with thicker section ‘fishtail’ type ties.
- Generally, wall tie corrosion affects houses between the 1920s (first cavity walls) and 1981 (which was when zinc coating was tripled in thickness).
- However, wall tie problems caused by poor embedment, low tie density and inadequate supervision can be found in all cavity wall buildings, even new ones.
Acceleration can be caused by:
- Aggressive chemicals, e.g. black ash in mortar.
- Chloride salts, e.g. from marine sands or added to mortar as an accelerator.
- Carbonation – as the mortar slowly carbonates the protective alkaline layer is destroyed.
- The orientation – increased water ingress, often on South-West facing walls.
Is cavity wall tie failure a national problem or geographically restricted to certain areas?
Cavity wall tie failure is a national problem. It was thought at one time to be localised as it was believed that it occurred mainly in areas where a catalyst, for example, black ash mortar, increased the likelihood of breakdown. It was later appreciated that the problem was more widespread and the causes more complex.
However, the geographical issues of adverse weather and salt in the air can lead to a more rapid breakdown of the wall ties. Likewise, the localised use of wall ties prone to failure could create pockets of increased failure.
What is the difference between cavity wall tie failure and sulphate attack in brick walls?
Cavity wall tie failure is identified by horizontal cracks that correspond to the mortar courses containing the ties, often at 450mm intervals.
Sulphate attack in brick walls may occur in every joint. Often a white colouring is seen in the mortar as it deteriorates. It is also often accompanied by frost attack as a by-product of the large volume of water involved.
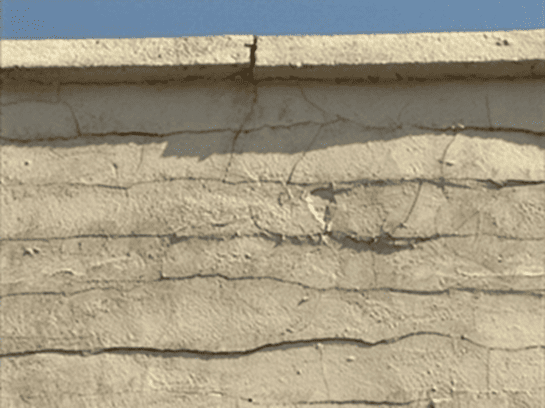
Figure 2: Cracked render above brickwork affected by sulphate attack
The photographs below demonstrate some of the classic signs of cavity wall tie failure:
• Horizontal cracking high up on the exposed south westerly elevation.
• The property was built in the 1930s.
• It was made using black ash mortar.
• Just visible within the cavity (which could be seen through the cellar door entrance) was a wall tie with visible rusting.
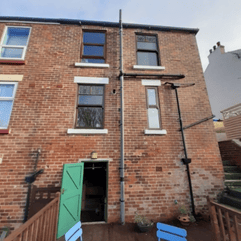
Figure 3: Southwest elevation
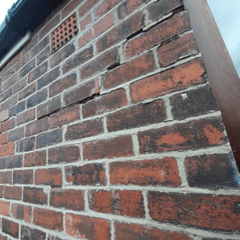
Figure 4: Closeup of cracking evident on top floor
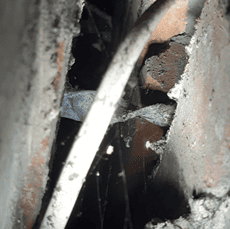
Figure 5: Wall tie with visible rusting
When undertaking a level two survey, a surveyor who suspects an issue with the cavity wall ties would make their client aware of their findings and recommend for further investigations. So, what happens when the specialists are called in?
A day on the tools with Brick-Tie
Brick-Tie Limited are experts in wall ties and structural repairs and they are highly regarded members of the Property Care Association (PCA). I asked Bryan Hindle, Managing Director, if I could shadow his team for a day and he kindly agreed. The property requiring repairs was a three-bedroom semi-detached house in Sheffield.
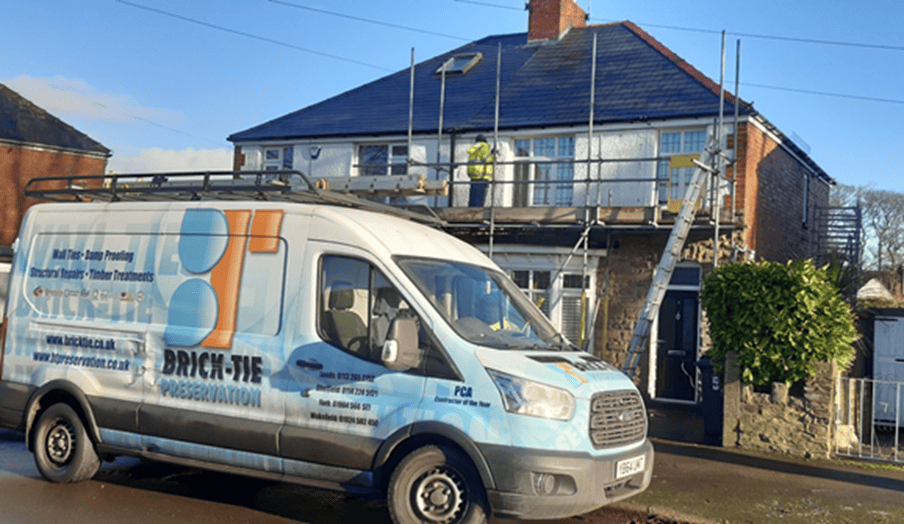
Figure 6: Outside the property
The process
The first step is to drill a hole into the cavity and use a borescope to identify the wall ties that will require replacement. A borescope is the preferred option, but the prevalence of cavity wall insulation has increased the need to remove bricks or chase-out bed joints so that a technician can clearly see the extent of corrosion (if any).
Following the initial inspection, the technician will produce a report, if required, which will issue a detailed specification, including a quote for remedial work. If appointed, scaffolding will be erected (if necessary) and the technicians can then begin their work.
1. A metal detector is used to locate all the ties within the cavity. The technician will mark their position with a builder’s crayon (see the yellow line on the following image). Interestingly, some wall ties may be so corroded that the metal detector gives only the faintest of signals. The metal detectors have adjustable sensitivity, and the skill of the technician also helps to locate the ties.

Figure 7: Yellow line identifying location of old wall tie
2. Once all the old tie locations are marked, the technician uses a heavy-duty angle grinder to grind through the mortar and then into the head of the tie itself, chopping the tie down to about two-thirds of its original length. A vacuum attachment removes the debris created by the grinding. This is important as it prevents debris from falling into the bottom of the cavity, potentially causing damp bridging issues in the future. This process leaves a wall with a very pronounced series of horizontal chases in the outer leaf wall, as can be seen in the next image.
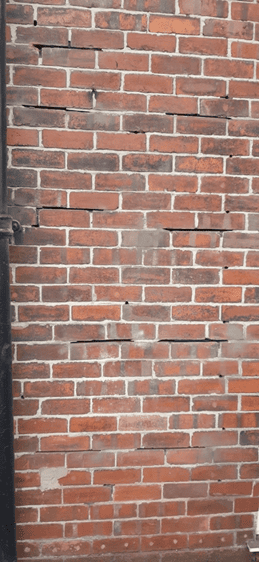
Figure 8: Horizontal chases in outer leaf wall
3. The new remedial wall tie holes are drilled into the mortar where the new ties will be installed (also shown in the image above). The technician drills the holes into both the outer and inner leaf at a slight upward angle, meaning any water that gets onto the new ties will gravitate toward the outer leaf. Brick-Tie used a ‘Helifix’ remedial tie with a helical twist along its full length. This helix acts as a repeating drip feature and provides an excellent key for the resin.
For several reasons, the holes are drilled into the mortar, rather than the centre of each brick (as many textbooks state). By drilling the mortar, the rear of the brick does not shatter which can occur when drilling through brick and blocks. This approach prevents a build-up of debris in the cavity which often results in damp and bridging issues, particularly for properties with existing cavity wall insulation. When the wall is repointed, if repointed well (Brick-Tie technicians use careful colour matching dyes in their mortar) the visual aesthetic of the house is maintained, and the property doesn’t have the polka dot appearance that some properties have after wall tie replacement. Finally, the mortar is softer than brick which reduces the amount of vibration exposure produced during drilling, leading to safer long-term health outcomes for Brick-Tie’s technicians, helping avoid Hand Arm Vibration (HAV) related injuries, like vibration white finger.
4. The remaining old wall ties are ‘isolated’ to prevent future issues. This is essential because there may be a small wafer of old tie left in the outer leaf, which will corrode and expand in the future. The chases (horizontal holes left by the angle grinder) need to be re-pointed without re-encapsulating the remaining tie section in mortar, where its continuing corrosion would otherwise cause new cracking. Although the new wall ties would hold the inner and outer walls together, the rusting old ties could still cause issues with expansion and cracking. As such they are ‘isolated’.There are many methods of doing this, but a common and efficient method is cutting pieces of plastic DPC and creating an isolator hood that is pushed into the gap to encase the old tie and prevent new mortar from touching the tie. In effect, the remaining section is left in a void – an expansion pocket, into which the slight growth of the thin section can expand, without being constrained. This is then over-pointed. The correct and diligent treatment of the old ties is the most frequently neglected part of wall tie corrosion projects. However, the basic methodology is proven to work and has been used for over 35 years.
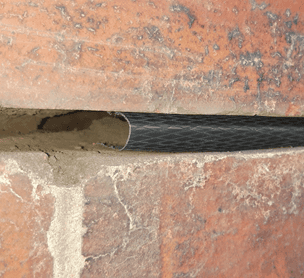
Figure 9: Plastic isolator hood
5. Brick-Tie has created its own styrene free, self-mixing resin, which is injected through the new drill holes first into the inner leaf. The new wall ties are then inserted before resin is injected into the outer leaf and left to set.
Tests are carried out to check the strength of the wall ties and resin. To do this, a random selection of the ties are inserted into the resin on the inner leaf and left to set. They are then tension tested to ensure that they are of sufficient strength to hold the two walls together. The test results are recorded, and the work can only be signed-off and guaranteed if the ties have passed all tests.
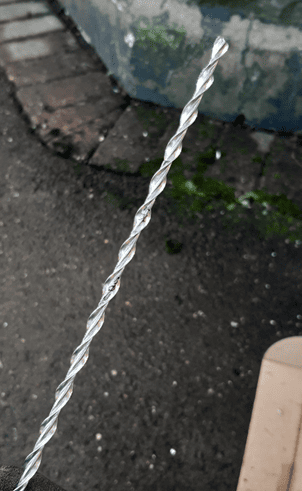
Figure 10: Helifix remedial wall tie
There are many different types of remedial wall tie, for example mechanical, friction fix, grouted, and chemical fixings. Bryan Hindle explained that most available systems are acceptable, adding “The surveyor or specifying specialist should consider each project on merit and use the most appropriate tie for that situation. There is no such thing as one-size-fits-all. The most important issue is not the wall tie, brand or model – the technician is the crucial element – skill, knowledge, on-site testing and most of all engagement in the success of the work is what makes or breaks any remedial work.”
6. The final stage of the process is repointing all the holes and gaps left by the ground-out mortar. A skilled technician brings a variety of mortar dyes and aggregates with them to colour match the mortar between bricks and the pattern of any render that may be on the property. However, this is a challenging process, especially in render – as exampled in the image below – and as such, repainting or repointing is common.
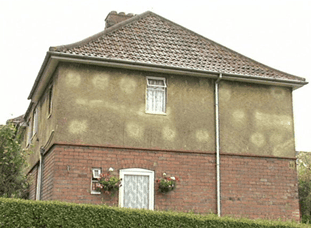
Figure 11: mismatched repointing, credit: www.designingbuildings.co.uk
This explanation is a very simplified version of the process Brick-Tie use, but of course, there are many other methods available. For more information, you can visit Bryan Hindle’s blog at http://www.preservationexpert.co.uk/
Another useful resource for information on the different types of wall ties is the Building Research Establishment Digest number 329 Installing wall ties in existing construction.
Considerations
It’s usually assumed that evidence of drill holes through brick indicate cavity wall tie replacement, and drill holes through mortar indicate cavity wall insulation has been installed. However, as Brick-Tie technicians described, cavity wall ties are now more commonly resin-fixed through the mortar, and not mechanically fixed through the bricks. Therefore, when evidence of drill holes are identified in external walls, although general principles can be followed, assumptions shouldn’t be made too soon. Drill holes in mortar, spaced at intervals of approximately 900mm horizontally and 450mm vertically may be evidence of wall ties.
Further research may be required to fully clarify what work has been conducted to the property.
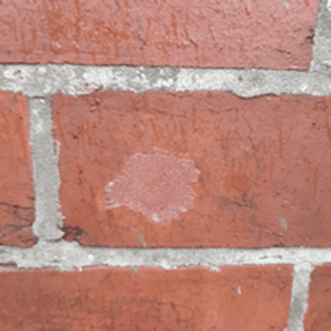
Figure 12: Drill hole evidence through brick
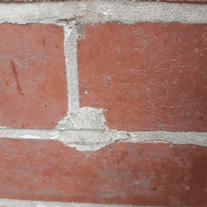
Figure 13: Drill hole evidence through mortar
Textbooks often state wall ties are usually at 450mm/6 brick course vertical intervals; however, this is not always the case. This was demonstrated in this case study with one small section of the wall having wall ties at intervals of 3,4,5,6 and 7 brick course intervals! The original builder of the property may have miscounted, forgotten to add a tie, or maybe even dropped one down the cavity and not been bothered to climb down their ladder to get another!
If you come across horizontal cracking when inspecting a property, don’t be fooled into thinking that it cannot be cavity wall tie failure if it doesn’t correlate perfectly to 6 brick courses.
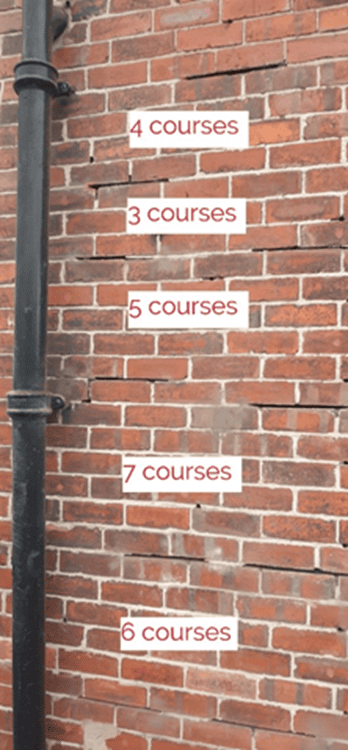
Figure 14: Inconsistent wall tie brick course intervals
Cracking is not always horizontal. Although the wall tie may be the cause, the ensuing cracking pattern may follow lines of weakness. Stepped cracks will often propagate where the stresses associated with tie expansion resisted by returns at corners, placing the masonry in tension. This is especially prevalent near weakly loaded areas such as at eaves level, below low parapet walls and around and under openings. (See figure 4 for reference.)
Having carried out some research in my area, cavity wall tie inspection surveys cost a similar amount to a drainage CCTV survey. The outlay is minimal compared to the potential cost and disruption to the client to replace wall ties throughout a property. However, not all vendors will allow such intrusive inspection and appropriate negotiation with the agent may be required.
Wall tie failure can often be subtle and easily missed. The property focused on in this article had only minor horizontal cracking and slight bowing to the side wall that could be easily missed. It highlighted the importance of considering the other evidence available, such as the age of the property, and therefore the likelihood of it suffering from wall tie issues; the finding of black ash mortar; and any evidence obtained from neighbouring properties that may be suffering from wall tie issues or have had their wall ties replaced.
It also brought to mind the relevance of part 11.3 (2f) of the RICS Valuation – Global Standards 2017: UK national supplement, which states (with reference to valuation inspections) “Where there are locational factors that may impact value, they should be recorded and reported, with some comment where appropriate. Certain problems, such as flooding, mining settlement, subsidence, woodworm, invasive vegetation, radon gas, mundic and other issues are particularly prevalent in certain districts. If appropriate, the valuer should make some reference to these defects, even if the subject property does not appear to be affected at the time of the inspection.”
Mentoring Tips
The coronavirus pandemic has prevented conventional surveyor shadowing and mentoring. The day with Brick-Tie led me to think about alternative methods of gaining experience. I’ve found some success with the following approaches that students may wish to consider:
- Approach non-conventional mentors or shadowing experiences. Perhaps a day with other professionals who work outside such as a day with a roofer, a builder, or a drainage company.
- If a prospective mentor is unable to meet you due to their health vulnerabilities or their organisational policies, perhaps they might consider ‘online mentoring. An hour a week/fortnight/month on zoom to talk through a pre-arranged topic area (so you can research prior) or discuss issues you have found could be a great benefit.
- It can be quite pressurising for surveyors if a student has approached them asking the surveyor to be a mentor. Surveyors may be reluctant to commit to a long-term arrangement. Therefore, if you are looking for some mentoring, ask if you can shadow the surveyor for a day or two. This way an initial arrangement is more likely. If you both enjoy each other’s company, it can easily lead to longer-term mentoring.
- Create a professional LinkedIn account and update your CV. Add the hyperlink to your LinkedIn and attach the CV to your emails. It helps prospective mentors get to know more about you.
- Approach a second-year Sava student! They know what you are going through and should have good knowledge of surveying, construction, and valuation. They may be able to assist you with any areas of weakness you may have. Also, they can answer specific questions you might have about the assessment requirements in the second year. You will often find them on LinkedIn.
Thanks to Bryan Hindle (Brick-Tie Ltd) and Phil Parnham MRICS for reviewing this article prior to publishing.
Chris Moran

Chris is a recent graduate of the Sava Diploma in Residential Surveying and Valuation. Chris has set up his own private company called Christopher Moran Residential Surveying, specialising in level 2 surveys and private valuations. He has kindly created a page on his website with useful resources which Sava students may benefit from: https://moransurvey.co.uk/sava-students-area